 Adam Bilsky
Updated :
Adam Bilsky
Updated :
| Note: This article contains video content that will not display or is not optimized to display correctly in the Foundry on-site support widget. For best results, we recommend reading the original in the Knowledge Base. Click the pop-out button |
Overview
This article covers the basic mechanics of creating and assigning learning experiences in Foundry. The Overview video was optimized for a very quick experience of creation through to evaluation. This article focuses on creating and assigning the experience. If you have already created a test experience and feel ready to take a deeper dive, read this article about Assignment Options and Workflow.
Contents
Overview Video
Note: The above video is designed and optimized for a very quick practice on the mechanics of creating and assigning experiences. A video exploring the workflow of an experience will be added to the Knowledge Base soon.
Create an Experience
In Foundry, the term "Learning Experience" covers any interaction between student and advisor - based on a plan that articulates learning outcomes. It can vary in scope from a 15-minute activity to a semester-long course; anything you design for your students intended for evaluation is a Foundry experience, and is handled with forms. Your site comes with pre-loaded forms; users with Admin privileges can edit these or create new ones based on need. The basic steps follow:
Steps
- Choose a form
- Create a title and description
- Select content and skills targets from the target chooser
- Add experience members
- Set start and end dates
Where should I be to start?To create a new experience as an Advisor, you must be on the Advisor (green) side of Foundry. From there, select "Create an Experience" from the Quick Actions menu (left, below). You can also navigate to Advisor > Experiences and click "Create an Experience" from the top right of that page (right, below)
|
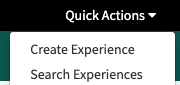 OR
OR 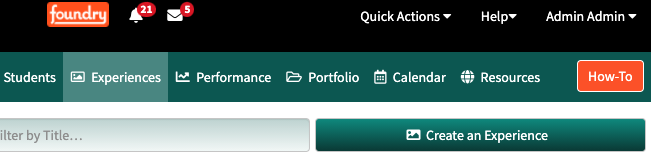
Choose a Form
The form chooser opens as a pop-up. The chooser will display forms available to you in your user profile. Note: The forms shown below are examples, and will likely differ from the forms on your site. If on your actual site you do not see options you are expecting, contact your school's Foundry administrator for assistance. If you are a Foundry admin, read here to learn about assigning forms.
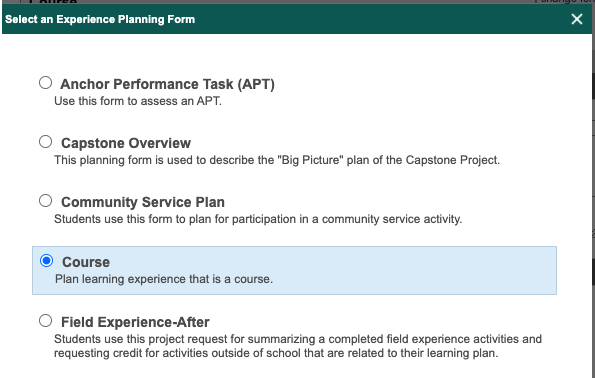
Select the form type that best suits your learning experience.
Create a title and description
This title will appear in many places throughout Foundry, including the Performance page, in Work-to-Do windows, and on student reports and transcripts, to name a few. Choose a name that is distinct enough from other experiences so you can find it in menus, yet concise enough to fit into displays and reports. You will be able to search by terms in the title and description in the search menu as well.
Required Fields
All Foundry experience forms have 4 required fields: title, description, experience members, and start/end date. Other fields can be made required or optional by the Foundry admin responsible for form design.
|
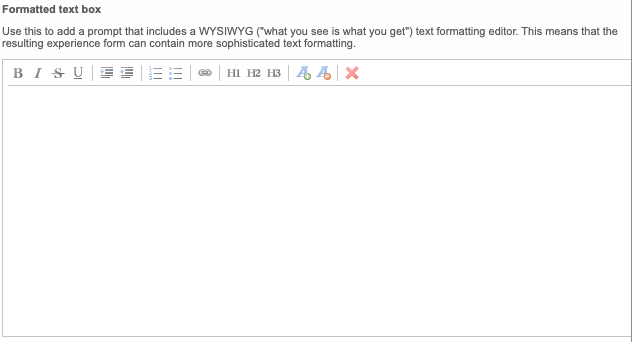
Note on text formatting: Most text fields in forms are fairly simple, and are not designed to hold large blocks of formatted text. Large paragraph boxes, for example, appear to hold spacing while you enter text, but this spacing will not save. If you want to use a field for a long description, or to hold formatting options, make sure you are using a form with a formatted text field, which looks like this:
|
Select content and skills targets
The target chooser displays the learning targets your school has included in your active learning target set, displayed in 3 columns: subject, subject group/target name, and target description.
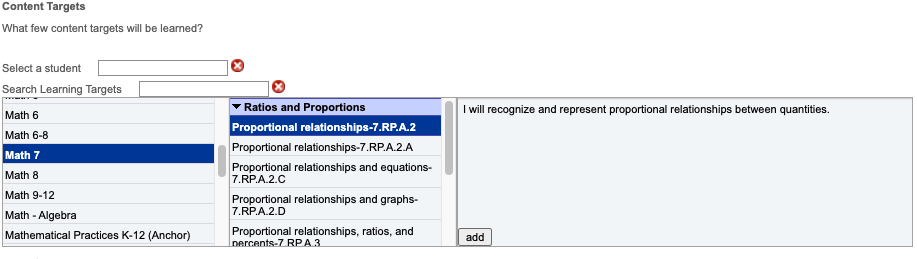
Click the desired subject(s) and subject group(s) from which you want to select targets. The target names appear under each subject group name in column 2. When you select a target name, the description appears in column 3. Click "Add" to add the target to your experience. A "remove" link will appear to the right of each added target. Click to easily remove undesired targets.
Additionally, if the plan is for a single student, you can choose targets from any of that student's learning plans. In this case, required targets (and the number of times remaining to earn them) are shown in red (with the number in brackets).
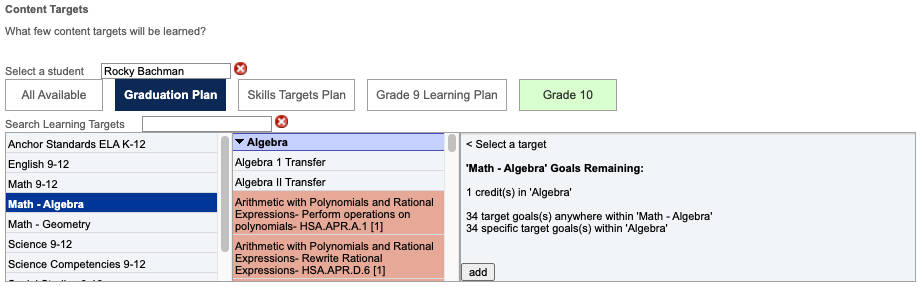
Repeat this process for skills targets if the form you have selected contains a skills target chooser.
| Pro-tip: Double-click the subject group name to add all the learning targets in that group. |
Add experience members
You can type individual names in the text box, or select and add entire groups to the experience. As with targets, you can remove individuals by clicking the "remove" link beside their names. The advisor creating the experience is automatically added, so you do not need to add yourself.
| Note on visibility for advisors: Any advisor who is a member of group with a student listed on an experience will be able to see the experience when viewing her students. Only those advisors associated with the experience (they created or were added to it) or listed as managers of the experience will be able to edit the experience. For more on visibility, read here. |
Set start and end dates
As soon as an experience is assigned, members will see it as active in their Work-to-Do and Experiences pages.
The start date is what the date filter on the Experience page (and other locations in Foundry) uses to capture an experience.
The end date will display on the Experience page in the "due date" column. The date will change to yellow when the due date is near, and to red when the due date has passed.
Assign the Experience
Assigning the experience is the final step in creating it, although you can always save an experience plan to finish and assign later. There are several ways to assign an experience in Foundry, but for your first time through, we will skip the Workflow between student and advisor. The goal is to produce data you can view on the Performance page.
Select "Assign and evaluate" to assign the experience and proceed directly to evaluation. This is shown in the video above, to demonstrate the life cycle of a quick experience. It is not a default recommendation; however, valid uses for this option in practice might include small assignments completed in a live classroom setting, like an exit ticket.
Basic Evaluation
As demonstrated in the demo video above, click 'Standards, Credits, and Grades' (skipping the Assessments tab), and assign the corresponding grade marks. Click 'Save' when finished.
Click the Skills tab and repeat for the Skill target you assigned, then click 'Save.'
If your target evaluation scale differs substantially from what is shown in the video, use your judgment to determine appropriate marks. The main goal is to assign the scale marks, grades, and credits (as your school uses them) for Content and Skills targets so you can view them on the Performance page.
Skip the 'Comments' section for now, and click .
| Note: It is not necessary to complete a project to view all data on the Performance page, but it simplifies the view somewhat and suits the purpose of this initial experience. |
Once your experience is completed, click the Performance tab on the green Nav bar to view your new data. At this point, there will probably be little to no data to view, but next you should read about the Performance Page to get a sense of the data you will see. As you add and evaluate more experiences, your Performance page will become a more robust data source and display.
You can also read in more detail about Evaluation here.
Summary and Next Steps
The purpose of this article was to teach the basic mechanics of creating and assigning learning experiences. We suggest proceeding to the articles about evaluating Experiences and the Performance Page next.
Other articles in this section cover in more detail the common components of an experience - journals, logs, tasks, and evidence, as well as experience workflow, the evaluation process, and viewing evaluation data from learning experiences on the Performance page.
It is strongly recommended that you practice creating, assigning, and evaluating a test experience first. Then, create another experience with more depth, experiment with viewing the workflow between students and advisors, and test different assignment options and evaluation techniques before creating new learning experiences for actual students.
When you're ready to try building a more complex learning experience, read the article Assignment Options and Workflow.
Suggested Reading:
| Note: Articles linked here under "Suggested Reading" are chosen by Foundry Support team members for their relevance and are updated as needed. The articles listed here may differ from those on the right side of the page, where the Knowledge Base AI lists "Related Articles." |
Experiences: The Experience Page
Labels: Experience, New, create experience, learning experience,
Comments